
Are you tired of fixing those bulky PDF files that hinder your digital life? Well, do not worry, In this article, we will address the foundational problem of large PDF file sizes and discuss some effective techniques that will help you to shrink PDF sizes online. By delving into different techniques you will be able to optimise PDFs for enhanced efficiency and smoother workflows.
By exploring different compression methods and tools available, you will get some insights into streamlining your digital document management practices. From faster upload and download times to storage space efficiency, the benefits of shrinking PDFs are substantial. So let’s get started and embrace the journey towards overcoming the challenges posed by oversized PDFs.
Understanding the significance of shrinking PDFs
There are numerous advantages of compressing PDFs like accelerated upload and download speed, less storage space use and simplified sharing processes. All these key advantages help people gain efficiency and increase their productivity whether professionally or personally.
Using small-size PDFs makes it simpler to share data and enables smoother collaboration and quick access to it. By understanding the need for PDFs, you and your team can optimise your digital workflow, maximise productivity, and streamline operations across different domains.
Techniques to shrink PDF file sizes
1. Avoid scanning PDFs
Whenever it is feasible, try to convert your document to a digital format rather than scanning the physical documents. This approach would help you yield small file sizes as electronically converted files are quite compact. Further electronic documents are quite manageable for digital processes.
If your document is already scanned, then you can opt to convert images to text using the OCR advanced feature available in the PDF editor.
2. Save your document as “Reduced Size PDF”
In popular PDF editor software, there is an option to resize PDF files by saving them with a reduced size setting. This is quite a straightforward process that allows you to create smaller-size PDFs while retaining the compatibility and essential settings of PDF without compromising the overall document integrity.
3. Use Adobe Acrobat’s PDF optimiser
Adobe Acrobat provides a powerful tool that lets you gain precise control over PDF compression. This multipurpose tool lets you audit the space usage of your PDF and selectively compress different components resulting in larger file sizes. By compressing selective elements like images and fonts, you can drastically reduce your PDF file size while maintaining the overall PDF quality.
4. Save the file to a reduced size in MS Word
If you have prepared a document using MS Word, then while saving it as PDF, you can opt for the option “Minimum size (publishing online”). This will help you to save files in small sizes without sacrificing the overall quality of the PDF document. Moreover, it will ensure that your PDF size stays within the acceptable limits of digital submissions and eFilling.
5. Use compressed images and graphics
It is quite advantageous to compress images before adding them to your document. This will ensure the optimal file size without losing the image quality. Using an image compression tool, you can easily optimise images in batches at once before you export them. Additionally, you should also keep the uncompressed images in case you are not satisfied with the compressed graphics.
Optimising PDF size using Adobe Acrobat optimiser
There are two ways through which you can use Adobe Acrobat Optimsers, the first is to use the official Adobe website and the second one is to use the Adobe application. Here is the step-by-step guide for both methods:
Steps to reduce PDF size online using Adobe Website
Step 1: Open the Adobe Acrobat Official Website

Step 2: Upload your document by clicking on the “Select a file” option.
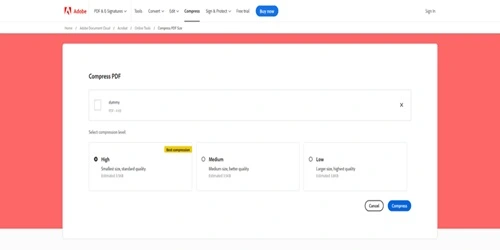
Step 3: Choose the compression level for your document. It is recommended to use a “High” compression level.
Step 4: Click on “Compress” to start the compression process.
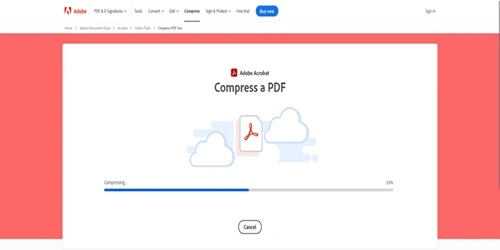
Step 5: Download the compressed file at the desired location on your computer
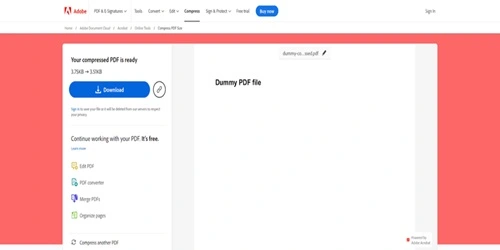
This is the standard practice that most individuals like students or working professionals follow. However, if you want to compress a document’s specific element in a more precise manner, then you can choose Adobe Acrobat Application.
Follow the instructions as mentioned below:
Step 1: Open your file in Adobe Acrobat Pro.
Step 2: Go to File > Save As Other > Optimise PDF and choose Advanced Optimisation Option. This will open the PDF Optimiser dialogue box.
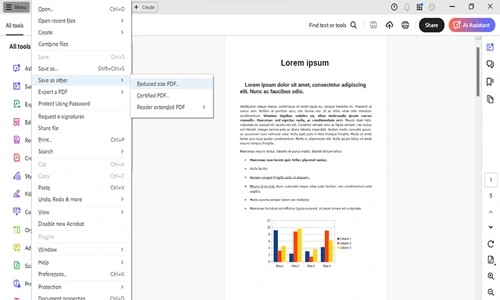
Step 3: If you want to use default settings, choose `Standard Option from the settings and click OK, whereas if you want to use custom settings, then choose the Custom option.
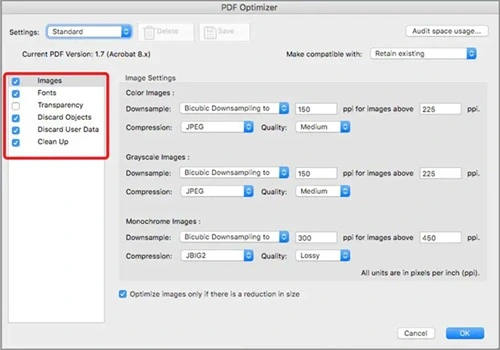
Custom option will give you access to settings of images, fonts and extra components which you can use to optimise PDF size.
Step 3 Save the customised settings to use it for other documents. Click OK.
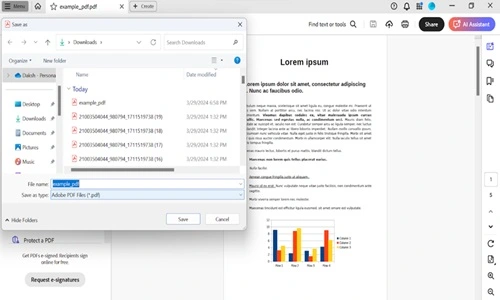
Step 4: Save your PDF file in the desired location.
Unlocking efficiency: Revolutionise your digital document management
Embrace the techniques discussed in the article to revolutionise your digital document management by harnessing the power of PDF compressing. Implementing these techniques would not only help you streamline your workflow but would give you complete control over your files, optimise the process and unlock a new level of productivity at your work.
Santosh Kumar is a Professional SEO and Blogger, With the help of this blog he is trying to share top 10 lists, facts, entertainment news from India and all around the world.
